Charna Albert
July 2022—Good slides in, good images out.
Liron Pantanowitz, MD, MHA, explained how to get those good images in a recent webinar on preanalytics quality control in digital pathology, sponsored by Sunquest and made available by the Association for Pathology Informatics.
“Most of the time when people talk about digital pathology and work on digital pathology, including the applications, they don’t pay too much attention to the preimaging component,” said Dr. Pantanowitz, professor of pathology and director of the Division of Anatomic Pathology, University of Michigan Health. “But if you have poor slides and poor tissue, how can you expect to have a good whole slide image and ask a pathologist to make a primary diagnosis on that image when you haven’t gotten the first part right?”
While a perfect slide and perfect image are the hope, he said, imperfect slides and images shouldn’t impair the ability to make a diagnosis. “Minor artifacts we can brush aside, but major artifacts we should not.”
Whole slide imaging of breast pathology is particularly affected by preimaging factors, he said, citing a study from pathologists at Nottingham University Hospitals. The authors examined 40,160 whole slide images of breast core biopsies and resection specimens and compared them with the corresponding glass slides, most of which were H&E slides (Atallah NM, et al. Mod Pathol. Published online Dec. 27, 2021. doi:10.1038/s41379-021-01000-8). “The main problem they reported—which I’ve heard from colleagues around the U.S.—was that with breast cases you can end up with pieces of tissue missing in your digital image,” Dr. Pantanowitz said. It happened mostly on the periphery, near the edge of the slides, and “one of the main culprits,” he said, was the fatty tissue, which is pale and thus can be missed by tissue detection algorithms. Atallah, et al., reported missing tissue in the images of the breast resections at a frequency of two to 19 percent (no missing tissue was identified in the core biopsy specimens). Though the area size of the missing tissue ranged from one to 70 percent, in more than 75 percent of cases it was less than 10 percent and peripherally located on the slide, making it more likely to be cropped from scanning regions. In all cases, the missed tissue was fat with or without small entrapped normal breast parenchyma.
Fig. 1, from the study, is an overview image of a fully scanned glass slide (A) and a high-power (40×) image of a normal breast terminal lobular duct unit (1.5 mm at largest diameter) present at the periphery of the slide (B) and missed on scanning (C).
“Who wants a digital pathology setup where close to 20 percent of the breast slides cannot be digitized or you’re going to be missing key tissue? No one would want to rely on that and be held liable for that kind of a problem,” Dr. Pantanowitz said.
The authors used manual quality control measures that involved macroscopically evaluating all slides for preanalytic artifacts before scanning. The scanner performed additional real-time QC, displaying user interface messages when barcode detection failures, macro focus image failures, and image quality errors occurred, and when no tissue was detected. Post-scan QC consisted of a review of image thumbnails (the low-resolution entire slide view of the whole slide image) to ensure all tissue on the glass slide was scanned. These protocols reduced WSI failure rates sevenfold, but checking every slide manually “required a huge investment of time upfront,” Dr. Pantanowitz said.
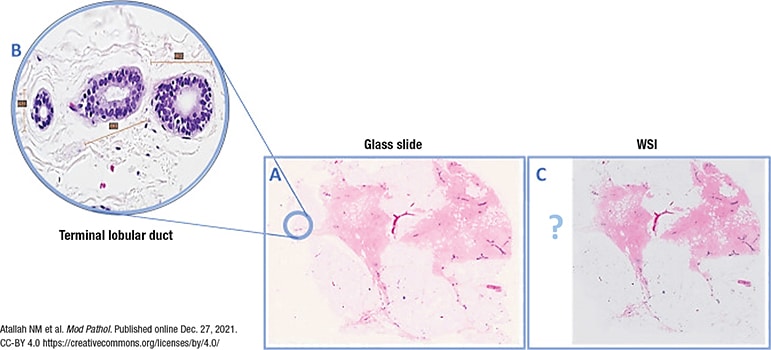
Fig. 1. WSI missing a normal breast duct at the slide periphery
(A) Overview image of a slide that was fully scanned. (B) High power of the normal breast terminal lobular duct unit on the glass slide (×40 light microscope) present at periphery of slide and missed upon scanning (C).
The CAP’s updated whole slide imaging validation guidelines were published in April (Evans AJ, et al. Arch Pathol Lab Med. 2022;146[4]:440–450). Good practice statement No. 7 says the validation process should confirm all material present on the glass slide is included in the digital image. Laboratories can do this by checking the digital image against the paraffin block, if it’s available, checking the glass slide (though that adds a redundant step), or checking the macro-image the scanner takes of the entire slide, which includes the label, barcode, and all fragments of tissue, Dr. Pantanowitz said. The macro-image, he noted, is different from the thumbnail. “The thumbnail will not tell you if there’s tissue missing—it only tells you what tissue got scanned.” Many systems do not display the macro-image, however. “It requires a few more steps to find the macro-image, unless you work with your vendor to readily display it.”
BlocDoc is a digital device that offers pathology labs a way to satisfy good practice statement No. 7 (Dr. Pantanowitz is a BlocDoc co-inventor). Many pathology labs today are geographically separated from their hospitals and thus the paraffin blocks. With BlocDoc, the blocks can be examined remotely. The device takes a digital image of the cut surface of the paraffin block, which is then uploaded into the laboratory information system and attached to the appropriate case based on the cassette barcode. Using BlocDoc, pathologists can verify whether all tissue from the block has been scanned. It also permits a polarized view of the block, making it easier to visualize tissue embedded deep within the block.
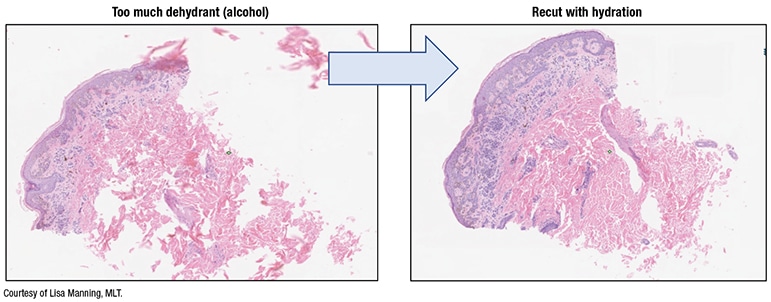
Fig. 2. Tissue processing impact
In a study published in the Journal of Pathology Informatics, L’Imperio, et al., reported fewer discrepancies with fragmented tissue specimens—transurethral resections of prostates, nasal polypectomies, and piecemeal uterine myomectomies, for example—when using BlocDoc in their digital workflow (L’Imperio V, et al. J Pathol Inform. 2021;12:32). “With all those fragments of tissue,” Dr. Pantanowitz said, “you’re never quite sure if all the fragments made it onto the slide from the block and all got scanned.”
Preimaging artifacts can make the pathologist’s job more difficult, Dr. Pantanowitz said. One example: reading frozen sections via telepathology when there are tissue folds, “especially if it was scanned in one plane and you don’t have access to focus up and down.” And slide artifacts can wreak havoc with biomarker image analysis algorithms, “and who knows what they will do with AI.” One study using the Visiopharm HER2 image algorithm demonstrated, for example, that blurred slides, as can occur when there is excess mounting medium on the slide coverslip, affected HER2 testing scores, turning a 1+, 2+, or 3+ into a 0 score (Pantanowitz L, et al. J Pathol Inform. 2017;8:39). “So you can significantly alter a major diagnosis for a patient, therefore incorrectly putting them into a therapy pathway, just based on too much mounting medium on the slide.”
“Be mindful,” Dr. Pantanowitz said, “that every slide that gets made in your histology lab will eventually be digitized.” His advice:
- Place specimens into fixative as soon as possible. “When I participated for 10 years in international telepathology consultations at the University of Pittsburgh Medical Center, poorly fixed tissues coming from rural areas outside the U.S. were almost impossible to examine on a whole slide image. So you want quality formalin fixation,” he said.
Open specimens whenever possible with thin slices to maximize formalin exposure, and use high-quality fresh neutral buffered formalin for the appropriate time. The ideal ratio of formalin to tissue: 15–20:1. And fatty specimens may require longer processing schedules than biopsies and small specimens. - In the grossing step, “don’t fill the cassettes with huge pieces of tissue that go all the way to the edge,” he said, because if they do, they’re also likely to reach the edge of the glass slide, where they cannot be incorporated into the bounding box and so will be out of focus or not scanned. Tissue should be no thicker than 4 mm—about the size of a quarter—and trimmed to fit easily within cassettes. And the number of tissue pieces per cassette should be limited.
- Some tissue processors can handle rapid processing, which minimizes the overall processing time “since we have now introduced an extra batch step with scanning. Tissue processing is important,” Dr. Pantanowitz said, “and you need to get it right. If you have too much alcohol [dehydrant], you can destroy your tissue, or fragment it,” and then the microtomy tech will have to rehydrate it (Fig. 2).
- Have a standardized process for routine embedding, such as cleaning forceps to avoid tissue carryover. And select the appropriate mold sizes—the tissue shouldn’t touch the edge of the mold. “If it touches the mold, it’s going to be touching the edge of the slide, which is bad territory for scanning.” Think about how the tissue is placed in the mold, “because the way it gets oriented and cut is how it will get scanned and presented on a computer monitor.” And limit the number of tissue samples embedded in the mold.
- In the microtomy step, “you want even sections, without tissue folds or wrinkles,” and the number of sections placed on the slide should be limited, he said. “I’m aware of people sometimes putting ribbons and ribbons of tissue on a slide, which takes a long time to scan. There’s a lot of unnecessary white space between all those pieces of tissue that drives up the data storage [costs] for a digital operation.” And then the pathologist has to look at the many small pieces of tissue in the ribbons, he said. “We want to make the image navigation easy, so limit the number of ribbons and the tissue in those ribbons.”
Orienting the tissue on the slide the way it will be viewed digitally is preferable to using software tools that rotate the image after scanning. “It makes for a better end user experience,” he said. Tissue samples should be placed close together for minimal white space and away from the edge, and skin epidermis should be placed on top. Another consideration: “If you’re doing immunohistochemistry work and there are tissue controls, think about how the tissue controls are placed on the slide.” If the controls are on one side, with tissue on the opposite end, “all you’re doing is scanning a lot of white space in between those controls.”
Section thickness should be consistent, he said, and ideally around 4 to 5 microns. Thick sections can affect image resolution quality, and varying section thickness can affect image analysis, with thick sections increasing stain intensity and thin sections causing greater stain variability.
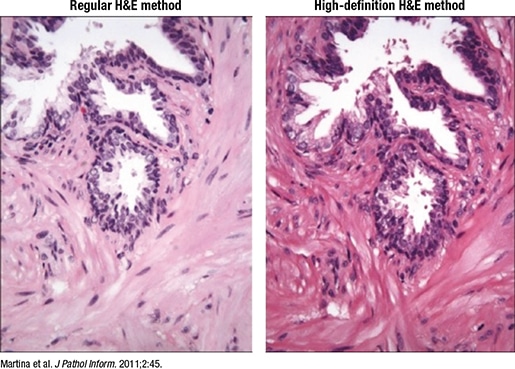
Fig. 3. High-definition H&E
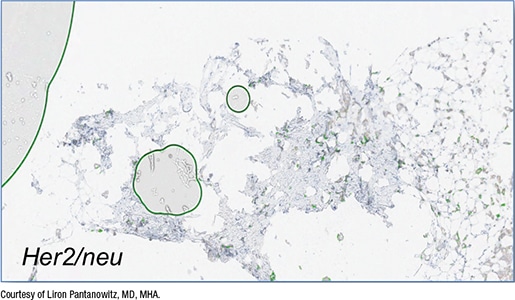
Fig. 4. False-positive QIA
- H&E, special stains, and IHC should be of the highest quality. One option is to use a “digital quality” or high-definition H&E (Martina JD, et al. J Pathol Inform. 2011;2:45), he said, which enhances the contrast “so you can see beautiful cellular detail, and when you do that, you end up with awesome whole slide images” (Fig. 3).
Laboratory workflow also makes a difference, Dr. Pantanowitz said. “You do want to tamp down moving slides around. The whole point of digitizing slides is to assist with the efficiency and automation process.” Some vendors have collaborated to make the process more efficient. Sakura stainer slide racks, for example, fit inside Aperio scanner racks, “which can go straight into the scanning device to get the slides digitized. That minimizes the work required to load the slides, but it also then makes sense to have the scanner close to where the staining gets done.”
Low-quality coverslipping with overhanging edges can cause the slides or even the robotics inside the scanner to break, he said. “You need the coverslips to be appropriately placed,” and completely dry before scanning. For primary diagnosis, when all slides must be scanned, “you can’t load wet slides into the scanner because that sticky mounting medium over time can cause havoc. So you may need to dry your slides.” One option is to heat them in an oven at 55° to 60°C before scanning. They also should be free of bubbles, dirt, and other defects.
In Fig. 4 is a core needle biopsy of an invasive breast carcinoma stained with HER2 but with bubbles, which the image algorithm read incorrectly as positive membranous staining for HER2. In fact, the breast cancer infiltrating the core did not stain strongly with HER2, Dr. Pantanowitz said. “Yet the algorithm falsely read this as HER2 3+ because of the air bubbles being counted as having membranous staining.”
Excess mounting medium should be avoided “because that can leak and end up on top of the coverslip.” Though it may not be a problem in an automated histology lab, “this is a problem if you’re making slides by hand in a small operation, or you’re using frozen section slides that you may need to scan at the time of intraoperative consultation or later when you get back to the histology lab and scan them into the case.” Excess mounting medium can cause the image to be out of focus or affect the mechanics inside the scanner.
In Fig. 5 is a slide with excess mounting medium. In the digital image (right), “there’s mounting medium on the coverslip and the area’s slightly out of focus.”
Unlike glass coverslips, film and tape do not require mounting medium and dry quickly. The tape sticks to the slide via a chemical reaction, Dr. Pantanowitz said, and the slides can be scanned immediately. But plastic is more easily damaged than glass, so the slides may get scratched when being removed from or returned to the slide archive. “And if someone is dotting or marking your slides and you want to then clean them with alcohol, you may damage the plastic.” Some have reported that if the tape isn’t high quality, or if the taping isn’t done well, it can peel. Warping over time is of less concern with today’s technology, he said.
Slide labeling, Dr. Pantanowitz said, is the “Achilles’ heel” of digital pathology. Imperfect barcodes are a frequent cause of scanning failure (Fig. 6). “Linear barcodes tend to get damaged more easily, and they can be stretched, so they’re not as robust as 2D barcodes.” And because the barcode readers on some scanners are overly sensitive, it’s critical to ensure that the labels do not overhang the slides and that they aren’t covered in wax or other debris. Label printer maintenance should be performed regularly, he said, lest the printer “be the cause of a failed digital pathology operation.”
Consult slides also pose challenges. “Foreign slides come with their own set of problems, including their own barcodes,” he said. Multiple barcodes on one slide can confuse the scanner barcode reader. “Putting your own barcode on is recommended so that it links the newly accessioned case to your lab information system, and that may require double labeling, or a piggyback label to cover the outside foreign label.” And because pathologists want to be able to read the foreign label, one solution is to place a new label with a transparent top and its own barcode over the outside label. The clear portion obscures the foreign barcode so it isn’t read by the scanner, he said, but a pathologist can still review the consult slide details. And the slide then can be returned without damaging the client’s original label. “There are vendors who supply such labels to deal with consult slides.”
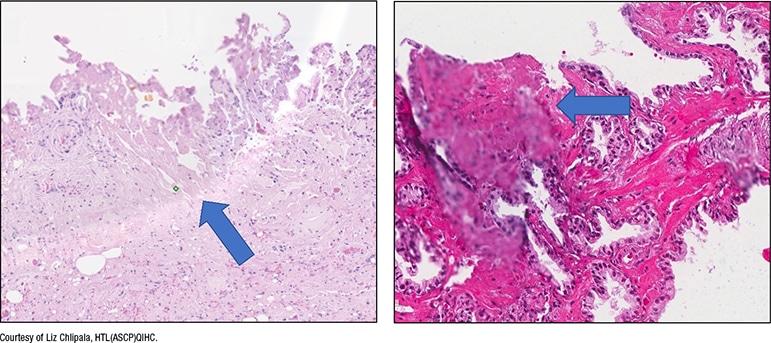
Fig. 5. Excess mounting medium
In a manual workflow, the quality check (QC) for slides is completed in the histology lab. “What happens in the digital system?” The question, he said, is whether the QC work should be done before or after scanning. “Everyone has a different solution, and some people have no solution,” he said. If the QC is completed before scanning, that involves having someone check each slide. “It’s manual, and it’s highly subjective and laborious,” and isn’t feasible for an operation in which all slides are scanned. “It actually goes against trying to automate this process.”

Fig. 6. Barcode-related scan failures
a. Scanners that read only 2D codes result in failure to read 1D barcodes. b. 2D labels printed out of alignment resulted in scanner failures. c. Misaligned added labels for consultation cases cause scan failures. d. Etched labels were found to be the most successful.
Dietz R, O’Leary M, Duboy J, Piccoli A, Hartman D, Pantanowitz L: Using Microsoft Power BI for real-time analysis of a distributed whole slide scanning operation, Pathology Visions Annual Meeting, Orlando, FL, 2019. Published in Journal of Pathology Informatics, 11, 1, S36-S37, 2020.
Another option is to QC slides post-scan, and have technologists pan only select digital slides at low magnification to assess for imaging artifacts. “There are some labs doing that, but it still takes time and they don’t look at everything.” Or slides can be sent to the pathologist without any QC, and if the pathologist finds an area of concern, they can request a rescan. Artificial intelligence tools that can perform this QC work are being developed, he said. Thus far, researchers have reported developing machine learning tools that can detect blur factor in images, create heatmaps that show where slides may be out of focus, detect tissue folds, perform stain normalization and correction, and even create “fake” sections. HistoQC, an open-source QC tool, is one tool that has gained popularity (available on Github—go to github.com/choosehappy/histoQC).
The CAP and the National Society for Histotechnology offer HistoQIP, in which an expert panel of histotechnologists and pathologists evaluate submitted slides for histology and scanning technique plus quality using grading criteria. Dr. Pantanowitz’s laboratory is a new enrollee. Their experience so far: “Scoring is quite harsh, but it has allowed us to improve the quality of our slides,” which he calls “perfect for a good, successful digital pathology operation.”
“AI developers are looking at using greater heterogeneous data for training models and trying to make sure they accommodate for artifacts. I don’t think it’s possible to do that for every case and every type of artifact,” he said. “So I think it’s time we also started standardizing our preimaging steps.”
Charna Albert is CAP TODAY associate contributing editor.